A Detail Guide On How To Fix A Leaky Bathtub Faucet
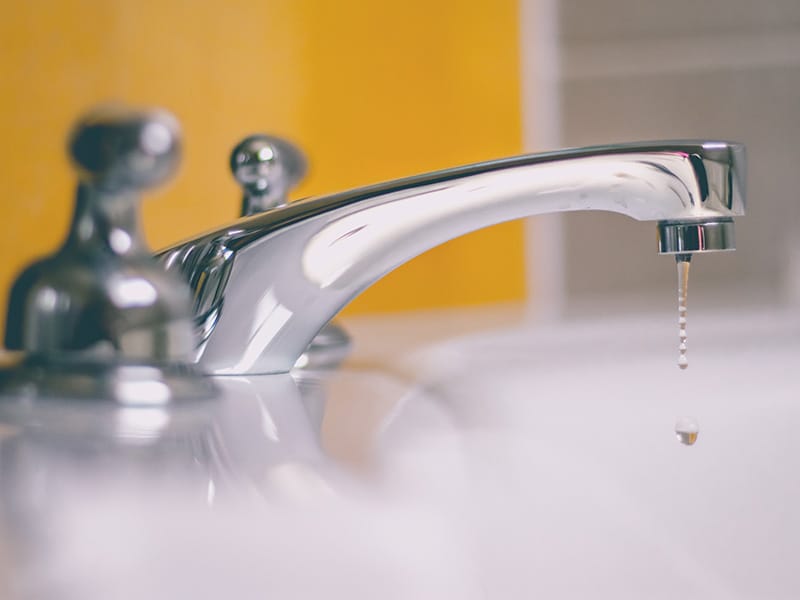
Learning how to fix a leaky bathtub faucet is not redundant at all. If you have ever experienced sleeping with an irritating, non-stop dripping noise or extra bills for water that you did not use, you will come to realize that this repair guide is utterly helpful.
Most people think that fixing a leaking faucet is a difficult job, and usually, they turn to a professional plumber for help. However, it is not that challenging, and with the help of the right tools and a little effort, your bathtub faucet will be working splendidly.
Fixing A Leaky Bathtub Faucet Is A Simple Matter
The repair procedure comprises eight steps as listed below:
- Remove the handle
- Unfasten the escutcheon
- Pull out the stem assembly
- Inspect the washer
- Inspect the seat
- Inspect other parts of the stem
- Reinstall
- Test the work
It does not sound like much work, right? First, you will get to know some common reasons that cause your bathtub faucet to leak. Let’s go!
What Makes Your Bathtub Faucet Leak?
It’s usually something beyond not having turned off the faucet completely. Below are some common causes that may be responsible for this annoying problem.
Bathtub Cracks
Some bathtub cracks are visible, but some are very thin, and not until they form some rust that you realize they exist. They can be sealed with a DIY repair kit, but I recommend that you let an expert do the job instead since there will be some drilling actions.
Faulty Shower Diverter
The shower diverter is a valve that reroutes the water in the tub’s faucet to the showerhead. In other words, it allows you to enjoy a hot bath and take a shower by pulling and pressing a rod or turning the handle, depending on what type of diverter you use.
Since the valve cannot be perfectly sealed, you can expect a small amount of water to drip out of the faucet. If it’s much more than that, the chances are that your shower diverter is faulty and needs to be replaced.
Washer
A washer is similar to a rubber band but much thicker, and it acts as a seal to stop the water flow. Over time, due to corrosion caused by water sediment and mineral build-up, it will crack or be worn out, allowing water to seep through and start leaking from the faucet.
Improper Installation On Tub Faucet
If the parts were not properly installed, leaks would happen. All the components should be tightened and are of the right size.
Plumbing Problems
A leaky faucet is sometimes more severe than you think, and sometimes, the plumbing system is the root of the cause. In such cases, there’s no use working on your own – pick up the phone and seek professional help instead.
Prepare The Tools
Now that you know what caused the bathtub faucet to leak, it’s time to assemble the tools for the work.
- Screwdriver (you may need both the flat head and the Philips)
- Hairdryer
- Seat wrench
- New or spare parts
- Penetrating lubricant and pipe dope, if the seat’s being replaced.
- Plumber’s grease
- Distilled white vinegar (optional)
- Scale remover (optional)
- Small knife (optional)
Got everything ready? If so, it’s time for some bathroom plumbing!
Fixing A Leaky Bathtub Faucet (8 Steps)
First and foremost, shut the water supply off while you are working with the faucet. You don’t want the water to splash your face all of a sudden. Okay, now you’re ready!
Note: This guide applies to most bathtubs except for the freestanding type, which is a bit trickier to proceed.
Step 1: Detach The Handle
You will need to open the faucet to drain any remaining water. Then, use the screwdriver to remove the retaining screw inside and remove the handle.
The handle can be pulled out by hand, but it’s a bit difficult if it’s old. If it seems stuck, you can pour a little boiling water on it or use a hairdryer to blow it. Avoid using too much force, or it can break.
Another trick is to spray a bit of distilled white vinegar under the handle. It’s okay if it drips. Wait for 20 to 30 minutes and try pulling it out again. And here’s the last resort if it’s really stubborn: a scale remover, such as Viakal.
Step 2: Unfasten The Escutcheon

Escutcheon is a decorative metal plate behind the faucet, and it can usually be removed without difficulty. Should it’s stuck, use the hairdryer trick to get it out.
The faucet has now been dismantled. By the time you are here, it’s essential to keep all the parts in a small container in the exact order you have removed so that you know how to put everything back.
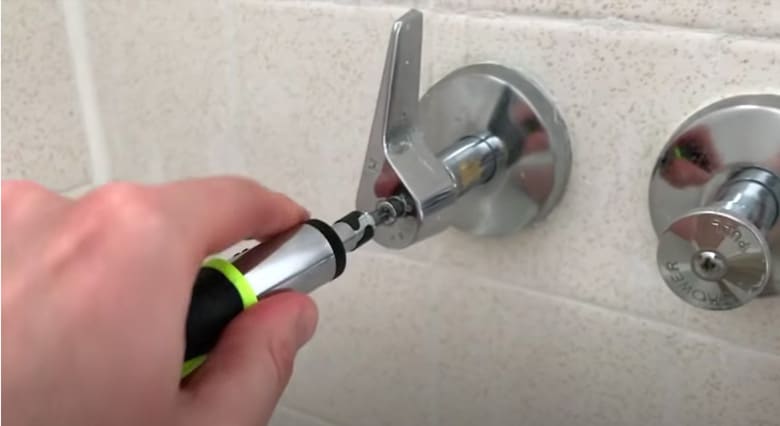
Step 3: Pull Out The Stem Assembly
After removing the escutcheon, you will see the stem assembly, and it should look something like the second photo below (the color and the length can vary). Remove it using a seat wrench (the first photo).
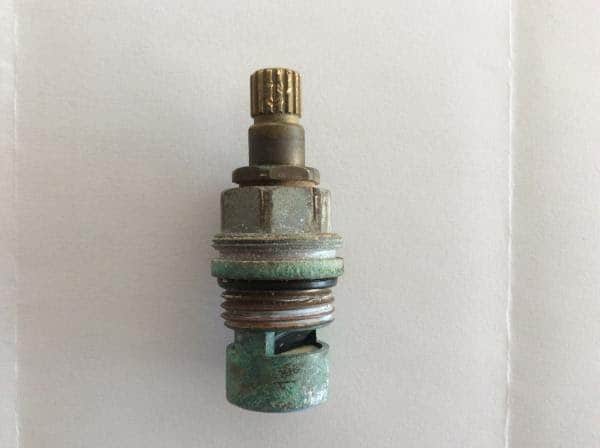
Credit: Do It Yourself
Now, you will continue working with it to figure out what’s the problem.
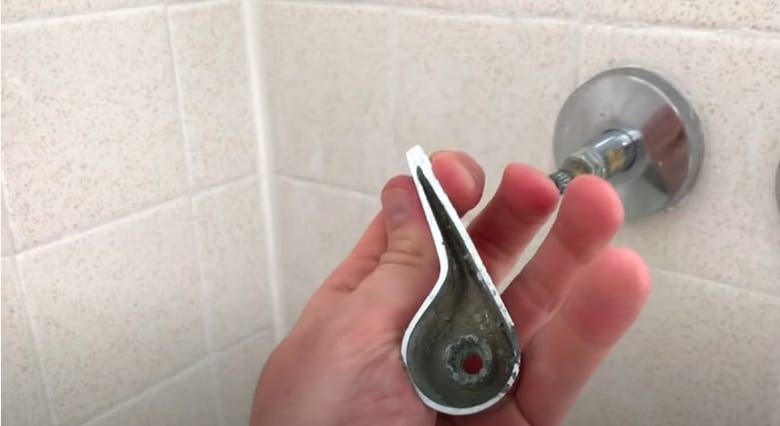
Step 4: Inspect The Washer
As I mentioned earlier, the washer is a ring that looks similar to a rubber band. Check whether your washers are still in good condition. Provided that it’s hardened, damaged, or covered with mineral deposits, you know it’s time to let them go.
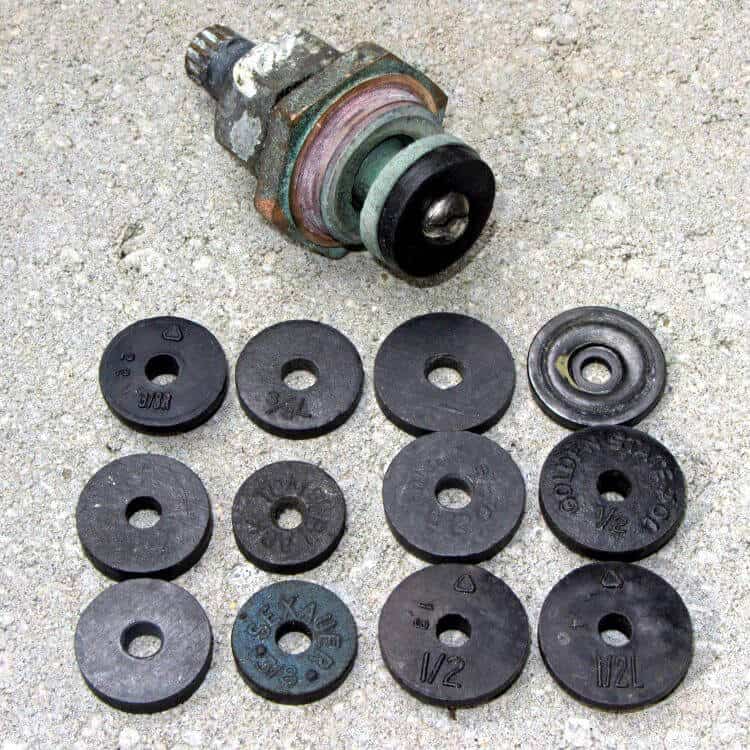
Credit: The Smell Of Molten Projects In The Morning
If you have spare washers, remove the washer screw, peel off the old washers by hand or a small knife, and replace it with the new ones. In case you don’t have any available, you can take the old one to the hardware store to find the matching one.
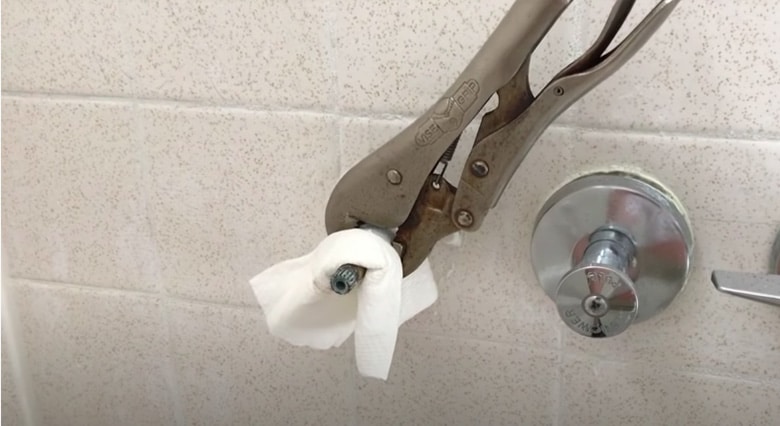
Step 5: Inspect The Seat
The seat can be damaged if corroded or worn out by mineral deposits. Replace it if it’s in a deteriorating condition. To do this, you will need a seat wrench, a special tool to do this job.
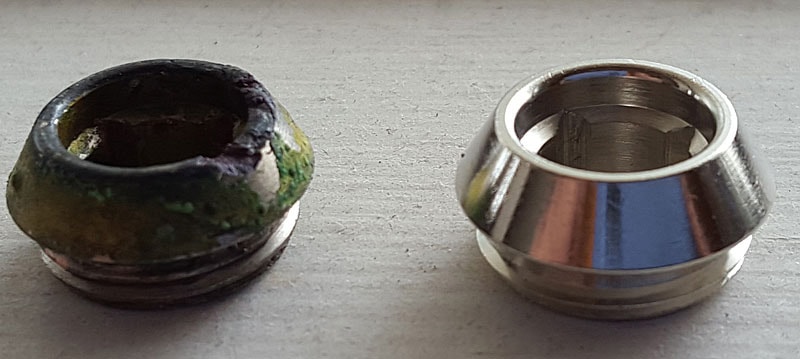
Credit: Terry Love Plumbing
Note: If the seat refuses to come off, soak it with penetrating lubricant. If you are planning to replace the seat, coat the threads of the new one with pipe dope, a type of sealant used to create a seal before screwing it into the fixture body using the specialized wrench.
Step 6: Check Other Parts Of The Assembly
If you want to make sure everything works perfectly, it’s worth having a look at other components, too. Look for any sign of damage and get rid of the debris.
If you don’t seem to find any problem but still want to replace it, stop by your local Home Depot and get a new one. It should come with the washers, too, so there’s no need to buy separate parts.
Should you want to replace only the faulty parts, remove and replace as per the following instructions:
Step 1: Remove the retaining nut out of the bonnet by twisting the stem clockwise
Step 2: Pry the old packing washer off with a screwdriver.
Step 3: Grease the stem threads and put the stem back into the bonnet.
Step 4: Slide in the new packing washer after greasing.
Step 5: Grease the threads before tightening the nut.
Step 6: Replace the washer. Again, grease it and the threads of the screw before installing.
Step 7: Replace the bonnet washer. Needless to say, you will also grease it.
Step 8: Apply pipe dope to the bonnet threads and reinstall it to the faucet body.
Step 9: Grease the handle splines and change the escutcheon and the handle.
Yes, it’s somewhat complicated, so consider buying a new stem if you don’t want to waste your valuable time.
Step 7: Reassemble The Faucet
Once you have checked and replaced all the faulty parts, it’s time to put everything back into place. You will do it in the reverse order, starting with the stem, then the escutcheon, followed by the faucet. Make sure that everything is tight but way not too tight for future repairs.
If you have two handles, repeat the steps with the other one.
Step 8: Testing
Finally, turn on the water supply and do a little testing. Unfortunately, if water still leaks from the faucet or new leak springs, you should not take the matter into your own hands and call the plumber instead.
However, if there’s no more leak, congrats – you have successfully pulled it off! No more wasting your money on the plumber and extra water bills!
Watch this video to know more:
Pro Tips For Fixing Your Leaky Bathtub Faucet
These brilliant tips and tricks will come in handy for future repairs, so don’t skip the following section!
- Find the right handle: if you have two handles, it’s recommended that you check which faucet is leaking by feeling the drips with your hand. If it’s hot, repair the hot handle and vice versa.
- Look for the matching replacements: it’s best to bring the old models to the store to do so. The components are rather small, and it can be a little tricky for you to tell them apart regarding the size.
- Don’t overtighten: future leaks are inevitable, and the chances are that you will have to do this again. Therefore, ensure that everything is not overtightened so that you can take it apart much easier later.
- Securing the seat: use a piece of Teflon tape to wrap around the threads in the seat before reassembling. Make sure that there’s space for the water to flow through.
And, here’s a fun fact: if you’re lucky enough, the leak will be gone once you replace the new handle. If not, you will have to go further to the stem to solve the problem. But indeed, it’s worth your time – cut the weeds and dig up the roots, you know.
FAQs
Have further questions? The following section got you covered with all the answers you need. Check it out!
A Friendly Reminder
And those are the steps of how to fix a leaky bathtub faucet – it’s pretty quick and straightforward, right? Even if you don’t know anything about plumbing, I’m sure you will succeed on the first attempt.
Keep in mind that the components should be gently removed. If any persists, wiggle it or try the tricks mentioned in the steps. You don’t want to break them and end up calling the plumber to help you with a gigantic mess that costs you tons of money.
I hope that you enjoy this post and no longer worry about the drippings again. As usual, should you have any further questions, comment right below, and I’ll reach out as soon as possible. Good luck with your work!